1. First empty the cache
To avoid retrieving a massive load of useless files, think about emptying the cache of your SPIP site before running a backup (especially if your site is heavily visited).
To empty the cache for your site, connect as an administrator and go to the page titled "Configuration > Empty the cache" in the private zone, and then additionally click on the button labeled "Empty the cache". The message "The cache is empty" wil be displayed once the action has been executed.
2. Backing up the database
The database if the heart of your information system: all the contents of the articles, new items, sections, authors, linked site and forums are stored in there [1].
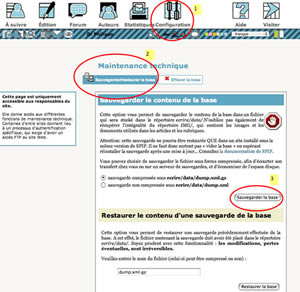
To execute a backup of your database (that is, all of your SPIP documents), go to the page "Configuration > Site Maintenance" in the private zone, select the "Backup/restore the database" tab, and choose which format you wish to use for the database backup.

Should I use database compression?
- As a short answer: always try a compressed backup first. If that fails, then try an uncompressed backup.
- Explanation: A "dump.xml.gz" file is compressed in order to save disk space and to reduce transfer time. In addition, it is a binary file that introduces less difficulties when transferring it from one computer to another. On the other hand, it will require the availability of tools to uncompress the .gz file. If you use an uncompressed "dump.xml" file, make sure that you use the "ascii/bin" settings in your FTP client software.
Then click on the button "Backup the database".
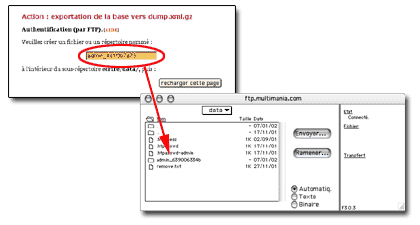
The FTP authentication procedure will start:

The new page displayed shows you a folder and filename that you must copy, inthe form of "admin_xxxxx". Copy this name and start up FTP client software. Open the FTP account that matches your site, and navigate to the folder indicated by the SPIP site(under SPIP < 1.9 this folder was ecrire/data, in more recent versions, it is now tmp unless you have specially reconfigured your site; but these folder changes aren’t of any genuine significance). Within the nominated folder, create a new folder using the name that you copied from the SPIP page (your new folder will then have a name like "admin_xxxxx").
Once this folder has been created, return to your web browser, and click on the button labeled "Reload this page". The backup will automatically start if you have correctly created that new folder as instructed.
If you wish, you can use your FTP software to confirm that the document "dump.xml" has indeed been created: this document is the backup of your site. You can now simply exit your FTP software, or a more cautious action could be to download that backup to your own personal computer.
Important note: This backup can only be used with the version of SPIP that was used to create it. Remember to make note of that, and/or to download a copy of the corresponding SPIP system version so that you can be sure you can reload the backup in case things go wrong. We strongly reinforce this advice, since it’s a very common error: when updating SPIP, do not reinstall the database from a backup created under a previous version of SPIP. Use your backup to relocate your site to a SPIP system with the same version.
Performing a complete backup
For simple SPIP updates, it is not necessary to backup your whole site. However, such a full backup is necessary if you are relocating your site.
To make a complete backup of your SPIP data, you should also remember to recover a copy of (using FTP):
- your /IMG folder (and its subdirectories), which contains all of the images and documents that have been uploaded or used to your site
- your "squelette" templates and everything else in your "squelettes" directory
- your modified CSS stylesheets and any other graphical components
- any personalised scripts (javascript or php)
- your personalised system files mes_options.php and mes_fonctions.php
- any contributions and plugins that you have installed (and possibly customised) and everything in your "plugins" folder